Interfacing Lidar Hokuyo URG-04LX-UG01 to Arduino with USB Host Shield.
Laser scanning sensor is advanced sensor device for mobile robotics usage. It can generate 2D environment data more precise measurement than the other sensor device such as sonar range finder or infra red distance sensor has. Some interesting features of this sensor are wide coverage angle and high angular resolution. It has 240 degree scanning angle and 0.352 degree angle of resolution, or 681 steps. Maximum distance is 5600mm with about 30mm accuracy.
This lidar has USB interface, so we need host controller with USB host support to make the measurement done. Regular PC with Windows, Linux or Mac operating system is normally used for capturing and processing its data. We have no problem with PC as a robot controller as long as the size is not considered big. But, how about small robots with a microcontroller as their brain? In this article, I want to share a brief description how to interface Lidar Hokuyo URG-04LX-UG01 to Arduino Mega 2560 with USB Host Shield.
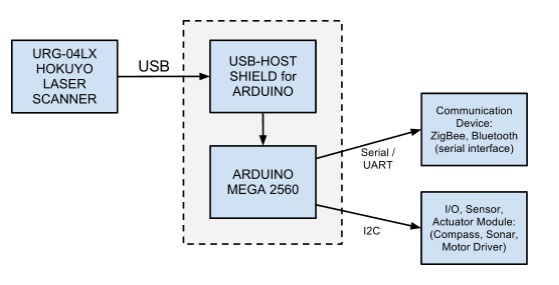
The block diagram consists of Lidar > USB Host Shield > Arduno > I/O or Communication Devices.

There are several types of Hokuyo Laser scanning sensor we can find on market. Some of them have both USB and Serial/UART communication interface. Since URG-04LX has only USB interface, we have to connect it to controller with USB host support. Glad we have a solution regarding USB Host connection to a Arduino board, a USB Host Shield based on MAX3421E chip. That shield is also supported by open source library at Circuits@home, http://www.circuitsathome.com.

Testing the Shield.
After installing Arduino software, connect your USB Host Shield to your Arduino board. We must connect external DC Power Supply to Arduino board to make the sensor run well and stable. Connect USB cable form PC to Arduino board (USB Device port) and install the USB Driver.
Your PC should detect port automatically. Connect your Hokuyo URG-04LX to USB Host port at the shield. Now you are ready to play with the sample codes.
To make sure that your USB Host Shield is running properly, please try USB mouse or keyboard sample code. Start serial terminal to monitor the result from mouse or keyboard.
Trying URG-04LX-UG01 is more complicated, but is not very hard. URG04 uses CDC-ACM (Communication Device Class - Abstract Control Model) on their USB communication interface, then we should try ACM_Terminal sample code.
Compile and send the code to the board then open any Serial Terminal software (use on Arduino terimal for easier). It should be shown USB data descriptor and by the ending should be displayed “ACM configured”. If you get another message, then should you check the connection or the power supply. Stable voltage to Arduino board is necessary with current more then 0.5A. Set the power supply voltage between 6V to 6.5V (you can try by your own to get the best value).
“ACM configured” means that we are ready to send command from Arduino to Hokuyo Lidar.
Reference:
Communication Protocol Specification For SCIP2.0 Standard.
http://www.hokuyo-aut.jp/02sensor/07scanner/download/data/URG_SCIP20.pdf
URG-04LX-UG01 specification at Hokuyo Automation website.
http://www.hokuyo-aut.jp/02sensor/07scanner/urg_04lx_ug01.html
When you have any problem, don’t hesitate to ask me.
Available language: English, Indonesian or German

